From Code to Runnable Package: What Happens Before Deployment
You've just finished writing a new feature. The code compiles locally, the tests pass on your machine, and you feel confident. But when you push the code and try to deploy, something breaks. The server complains about a missing library. The binary crashes because it was compiled on a different OS version. The deployment script can't find the right artifact.
This situation is more common than most teams admit. The gap between "code works on my machine" and "code runs in production" is filled with steps that are easy to overlook. Understanding what happens between writing code and having a deployable package is essential for any engineer involved in software delivery.
What Is a Build, Really?
When a developer writes code, that code is not yet ready to run on a server. It needs to be transformed into something executable. That transformation process is called a build. The output of a build is called an artifact.
Artifacts come in two common forms:
- Binary files: A single executable file that the operating system can run directly. Think of a compiled Go program or a Java JAR file.
- Container images: A package that contains the binary plus everything needed to run it: libraries, configuration files, environment variables, and the runtime itself. Container images are used when deploying to environments like Docker or Kubernetes.
The choice between binary and container image depends on your deployment infrastructure. Containers offer more consistency across environments, while binaries are lighter and faster to start. Either way, the goal is the same: produce a self-contained package that can be deployed reliably.
The Four Stages of Building
Every backend service, regardless of language or framework, goes through these stages. Let's walk through them one by one.
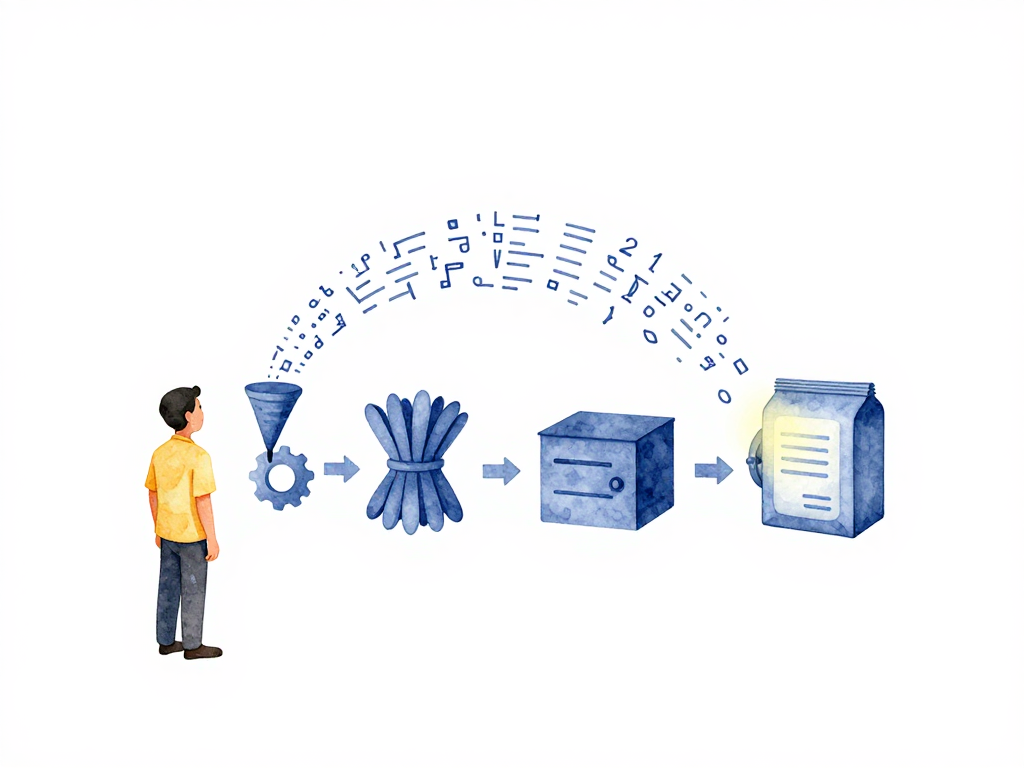
The diagram below shows the complete build pipeline from source code to stored artifact.
Stage 1: Compilation
If your code is written in a compiled language like Go, Java, Rust, or C++, it must be compiled into machine code or bytecode before it can run. Languages like Python, Node.js, or Ruby skip this step because they are interpreted at runtime.
The critical detail here is environment consistency. If you compile on a developer's laptop and then copy the binary to a production server, you risk compatibility issues. The production server might have a different operating system version, different system libraries, or different CPU architecture. Always compile in an environment that matches your production target as closely as possible.
For interpreted languages, compilation is not needed, but you still need to prepare the runtime environment. That leads to the next stage.
Stage 2: Dependency Bundling
Backend applications almost never run with just their own code. They depend on external libraries for database access, HTTP handling, authentication, logging, and dozens of other concerns. These dependencies must be collected and packaged together with your code.
The exact mechanism depends on your language ecosystem:
- Python: Run
pip installand collect all packages into a specific folder or a virtual environment. - Node.js: Run
npm installand ensure thenode_modulesdirectory is complete. - Java: Dependencies are bundled inside a JAR or WAR file during the build process.
- Go: Dependencies are compiled directly into the binary, so no separate bundling is needed.
The principle is simple: when the artifact runs on a server, everything it needs should already be inside it. No one should have to install dependencies manually during deployment. That is a recipe for inconsistency and failure.
Stage 3: Creating the Artifact
Now you need to produce the final package. If your team uses containers, this means building a Docker image using a Dockerfile. The image contains the compiled binary or the application code, all dependencies, basic configuration, and the command to start the application.
Here is a practical example of a multi-stage Dockerfile that compiles a Go application and produces a minimal container image:
# Stage 1: Compilation and dependency bundling
FROM golang:1.21-alpine AS builder
WORKDIR /app
COPY go.mod go.sum ./
RUN go mod download
COPY . .
RUN CGO_ENABLED=0 GOOS=linux go build -o /app/server .

# Stage 2: Create the final artifact
FROM alpine:3.19
RUN apk --no-cache add ca-certificates tzdata
COPY --from=builder /app/server /server
EXPOSE 8080
CMD ["/server"]
If your team does not use containers, the build output is a binary file or a compressed folder that can be copied directly to the server. Binaries are simpler and faster to deploy, but they offer less isolation and portability than container images.
Either way, the artifact should be immutable. Once built, it should not be modified. Any change means a new build and a new artifact. This guarantees that what you tested is exactly what you deploy.
Stage 4: Storing the Artifact
The finished artifact needs a permanent home where deployment processes can access it. This storage location is called a registry or repository.
- Container images go into a container registry: Docker Hub, Amazon ECR, Google Artifact Registry, or self-hosted options like Harbor.
- Binary files go into an artifact repository: Nexus, Artifactory, or even object storage like S3.
Every artifact must have a unique identifier. This is usually a version number, a Git commit hash, or a combination of both. With unique identifiers, your team can always trace which version of the code is running in production. When something goes wrong, you can look at the artifact ID and know exactly what was deployed.
Why Automation Matters
Each of these stages must happen the same way every time. If you build manually, you will eventually skip a step, use the wrong dependency version, or compile on the wrong machine. The result is an artifact that behaves differently from what you expected.
A CI pipeline automates the entire process. It triggers on every code change, runs the build stages in sequence, and stores the artifact with a proper identifier. The pipeline ensures that every artifact is built the same way, with the same tools, in the same environment.
This consistency is what makes deployments predictable. When you deploy an artifact from a CI pipeline, you know exactly what you are getting. There are no surprises from manual steps or environment differences.
Practical Checklist for Your Build Process
Before you set up your build pipeline, verify these points:
- The build environment matches the production environment (OS version, system libraries, architecture).
- All dependencies are declared explicitly (lock files, requirements.txt, go.mod, etc.).
- The artifact is built exactly once per code change and stored immutably.
- Every artifact has a unique, traceable identifier (version tag or commit hash).
- The build process runs automatically on every push or merge to the main branch.
- The artifact registry is accessible to the deployment process without manual intervention.
What Comes Next
Once the artifact is ready and stored, the next question is whether it is safe to deploy. That is where automated testing and security scanning come in. Unit tests, integration tests, vulnerability scans, and other checks run against the artifact before it ever reaches production.
But none of those checks matter if the build itself is broken. A reliable build process is the foundation of every CI/CD pipeline. Without it, you are deploying guesswork, not software.
The takeaway: A build is not just a technical step. It is the moment where code becomes a deployable asset. Treat it with the same rigor you apply to production systems. Automate it, standardize it, and make every artifact traceable. Your future self, debugging a production issue at 2 AM, will thank you.